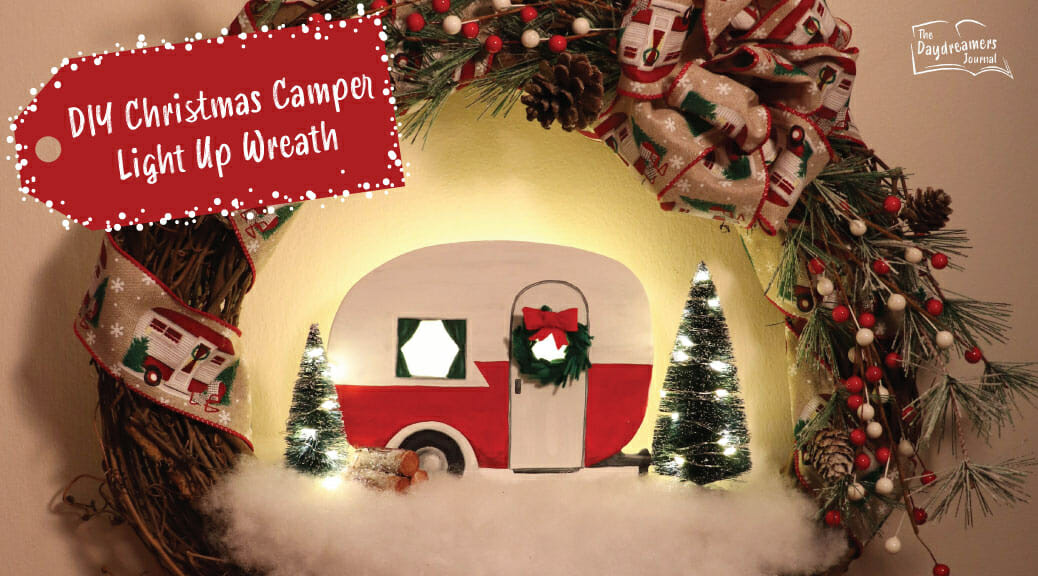
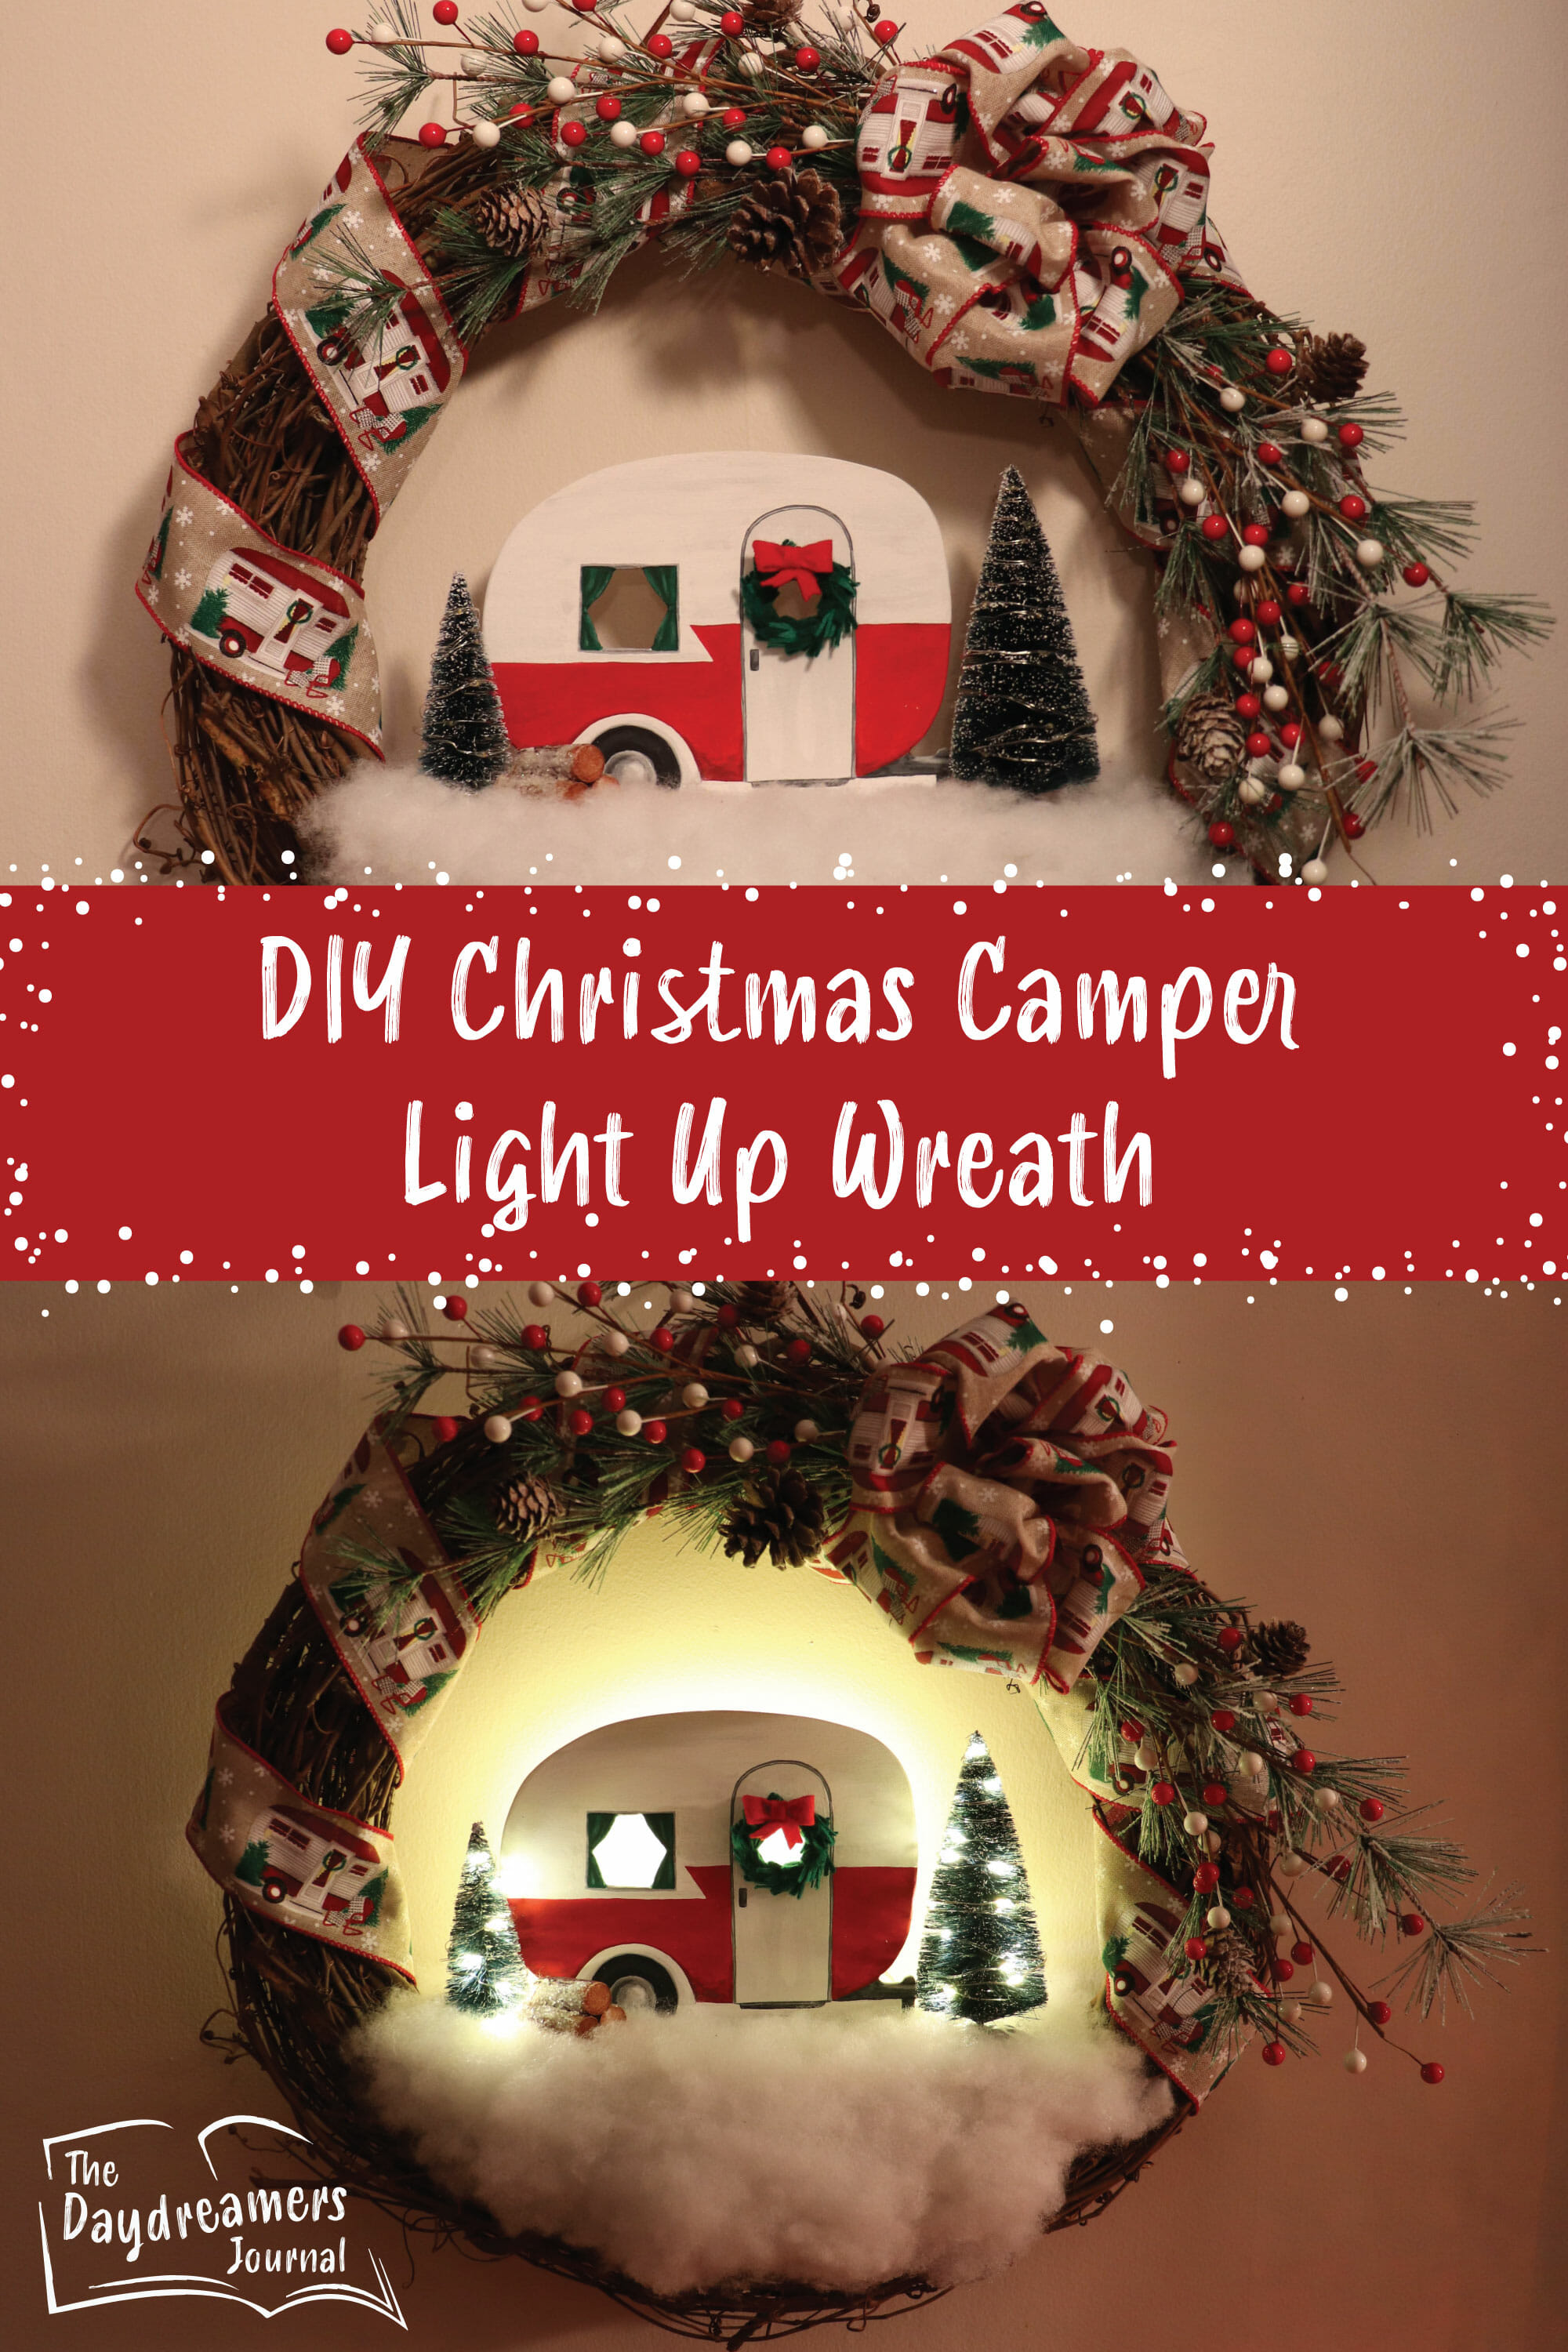
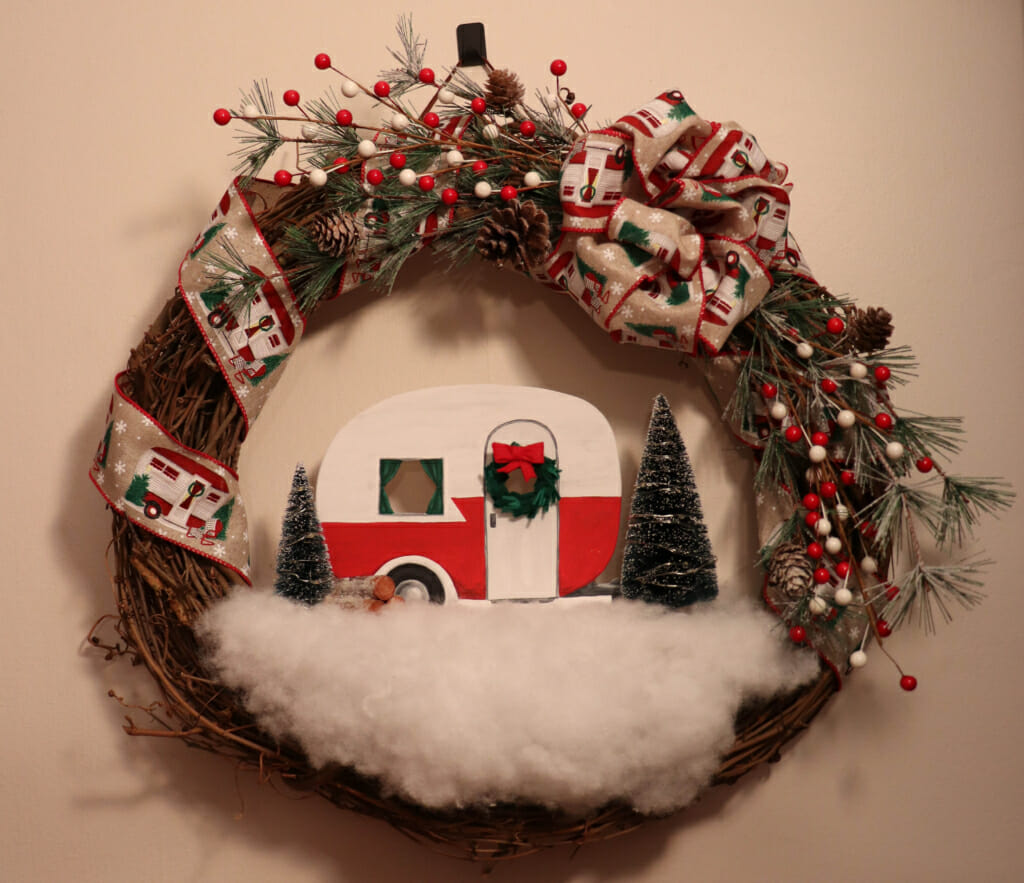
DIY Christmas Camper Light Up Wreath
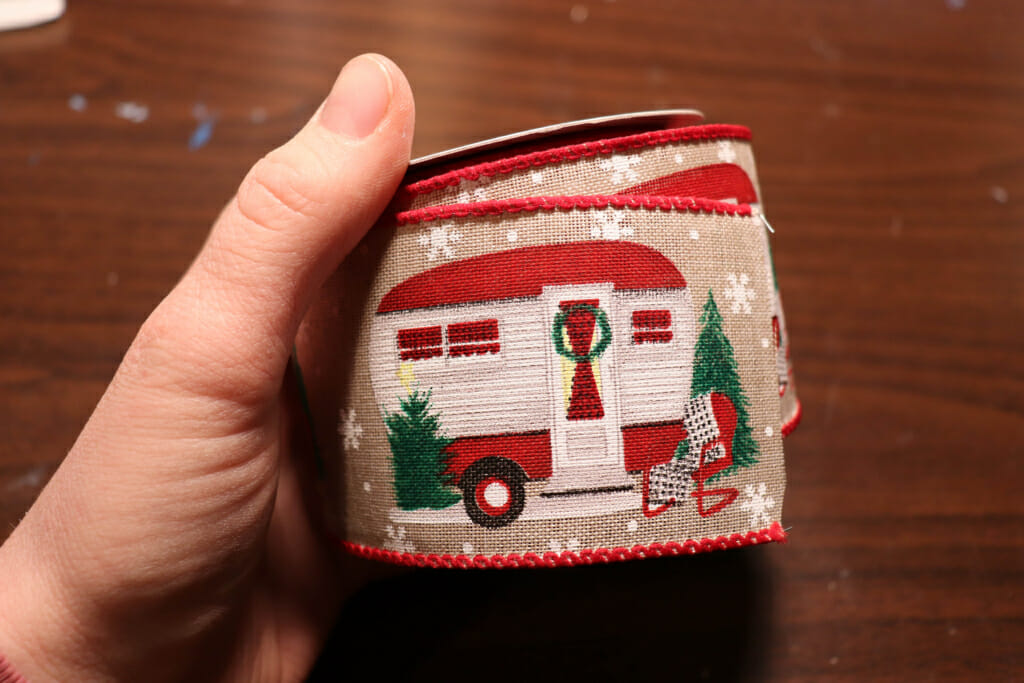
It all started with a spool of Christmas ribbon. Does anyone else have an addiction to collecting certain art or craft materials? Those materials that you see at your local craft store or small shop and you get drawn toward it, ‘just to look’ you tell yourself. Next thing you know, it jumps into the cart of its own volition. Okay, that may be an exaggeration, but there are those certain items that I really enjoy collecting, like yarn, paintbrushes, and you guessed it, ribbon. In fact, I have such a large yarn stash that my husband has cut me off from buying more until I use up some of my previously collected skeins.
I love ribbon, it can take ordinary things and turn it into something special, fun, rustic, or classy. Over this past summer, we took a family vacation to the Poconos. On our last day there, David and I stopped at one of my favorite places: the American Ribbon Store (we always called it ‘The Ribbon Factory’). My parents discovered this place several years ago when they would go on weekend church retreats in the Poconos area.
This place has tons or ribbon! You can find many unique prints and styles that you wouldn’t normally see at your local craft supply store. They also carry many other craft supplies beyond ribbon, including fabric, buttons, drawing supplies, craft kits and more. Anyways, while at the American Ribbon Store, I discovered this cute spool of ribbon printed with campers decorated for Christmas and immediately fell in love with it. Almost every year, we go camping with our family and David’s mom is a big fan of decorating for Christmas. So, as soon as I saw this ribbon, I was inspired to make a wreath for her for Christmas.
If you would like to make one yourself here are the instructions on how to do so.
Supplies:
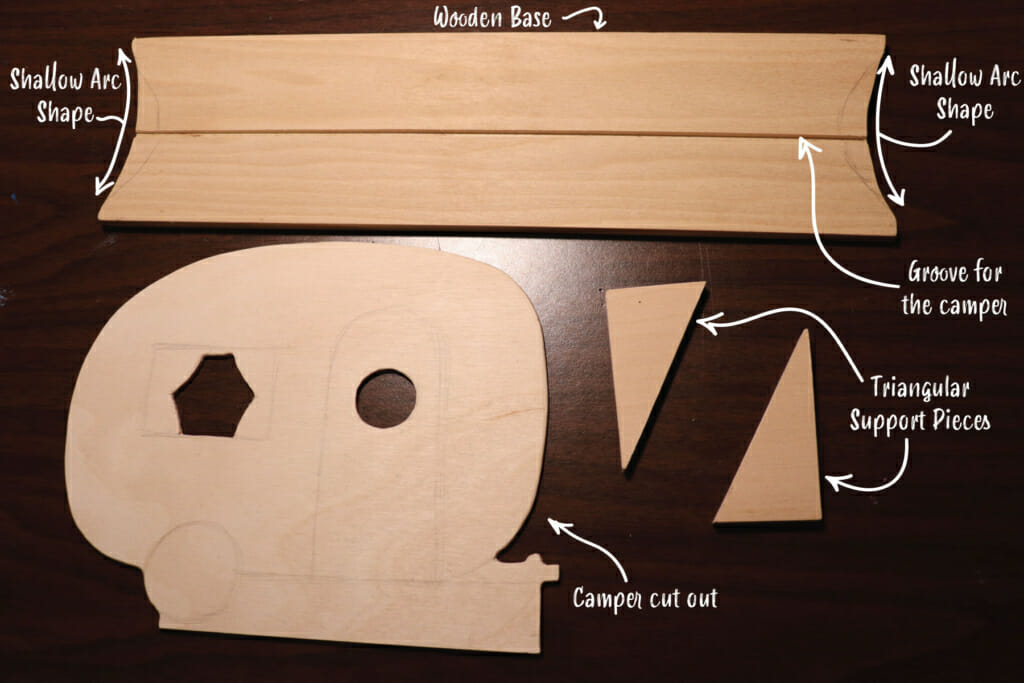
Wreath blank (the one I used here was 18 inches.)
Camper cut-out (Here is the camper pattern that I made. But if you aren’t interested in making a camper from scratch, or you don’t have the tools available to do so, check online or at a craft store. I found some really cute camper cut outs at my local craft store that would work just as well.)
Base for the camper to sit on (I made my own base out of a scrap piece of ¼ inch wood, approximately 12 inches long and 3 ½ inches wide, which we then cut a shallow arc out of each end to make it fit into the wreath better. We also used a table saw with the blade set to half the thickness of the wooden base to cut a shallow grove near the center of the board for the camper to sit snugly into. You can see a picture below of all the pieces.) Don’t have wood or tools for a wooden base? No problem! You could use a piece of Styrofoam or even sturdy cardboard or layers of carboard glued together as your base. Just be sure to glue your camper securely to the base with lots of hot glue so it doesn’t go anywhere.
Small wooden supports (as you’ll see in the picture below, we cut out small wooden triangles to act as a support for the camper. I wasn’t sure that this was totally necessary because the wood glue held it well, but I used one just in case the camper would get bumped. If you aren’t using a wooden base, you could cut these out of cardboard if you think your camper is a little floppy.)
Craft Paint
Wood glue
Various fake evergreen branches, holly, and other decorations
Ribbon
Battery Powered String Lights (here are the ones I used, I chose these because they had a remote with 4 different timer options)
Fake Snow or Poly-Fil
Various sizes of small decorative trees
Florist Wire
Felt of various colors (optional)
Tools:
Paintbrushes
Hot Glue Gun (preferably a low temp one or one with variable temperatures)
Hot Glue Sticks (my favorite is Gorilla Glue brand)
Sandpaper
Dremel (or other rotary tool)
Jigsaw (or scroll saw)
Drill or Drill Press (with various sized bits)
Scissors
Wire cutter
Xacto Knife and Cutting Board/Self-Healing Mat (optional)
Pencil
Eraser

Let’s Get Started
(Please note, if you are using power tools, be cautious! Be sure to wear eye and ear protection and treat these tools with respect.)
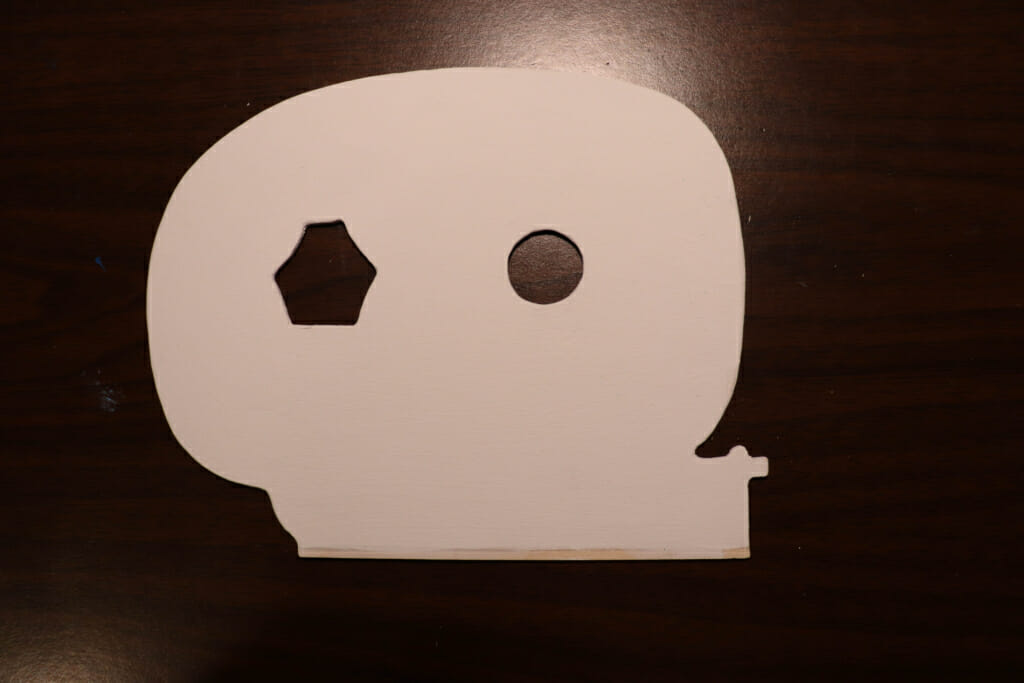
First things first, if you are using the camper pattern I included in this post, you’ll need to print it out (I’d use thicker paper like cardstock for this). Then, cut out the camper and the holes for the windows. An Xacto Knife and cutting board may be handy for this part. After you have your pattern, trace it onto the wood with a pencil.
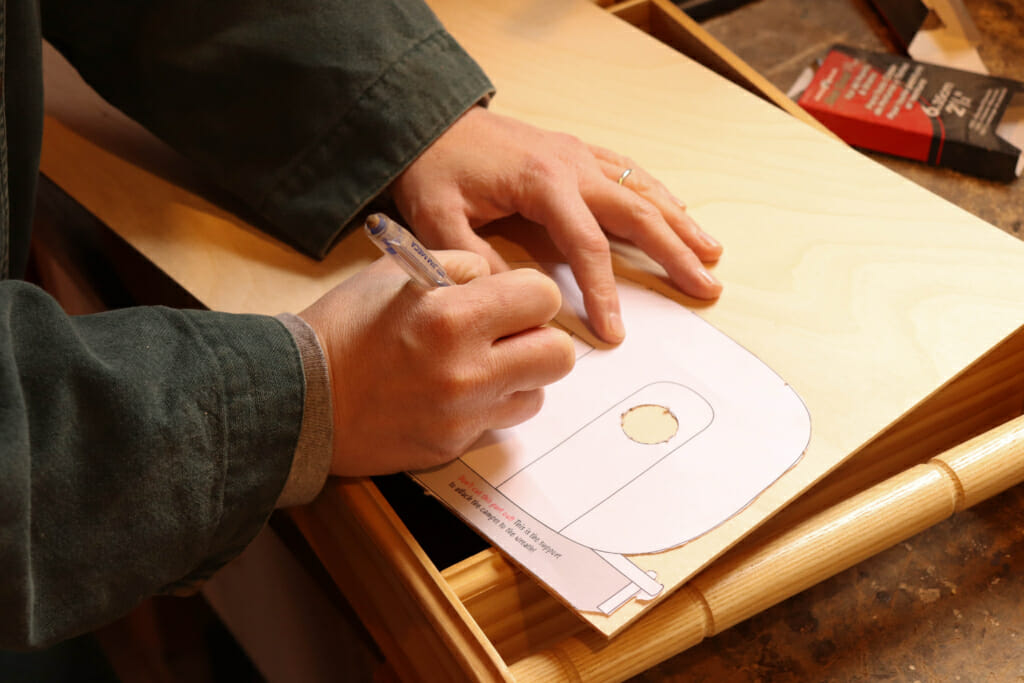
Drill holes into the windows of the camper using a drill or drill press with a drill bit larger than your jigsaw or scroll saw blade. Carefully cut out the windows of the camper with a jigsaw or scroll saw (you may also be able to use a Dremel for this part, if you so desire. I chose to drill multiple holes in the windows themselves and then I used my power carver attachments for my Dremel to cut the windows out). Then, carefully cut the camper out with a jigsaw or scroll saw.

Sand the camper with fine grit sandpaper (I used 220) to get rid of any jagged edges or rough spots. The smoother the finish, the easier it will be to apply paint. If you are using a wooden base like I did, measure the interior of your wreath where you want your base to rest. Then add an extra inch to the length to allow yourself to cut the shallow arc from each end. How wide you make your base depends of the thickness of your wreath; the width of my base was about 3 ½ inches. Using a table saw with the blade height set to half the thickness of your base, carefully cut a groove lengthwise in the middle of the base. Dry fit the camper to the base to make sure it fits in snuggly.
This next step is going to take some guess work on your part since every wreath blank is going to be slightly different. Observe the shape of your wreath and measure the depth of your wreath sides to decide how wide to make your shallow arc shapes. Then, trace the arc shapes on each end of your base and cut it out. You may be able to cut a simple triangle out of each end of your base instead of the arc shape depending on the shape of your wreath. Sand any rough edges of your base. Below is a picture of all the completed pieces. You’ll see that I had some pencil lines on the base. After testing the fit in my wreath blank, I wanted to take a little more off each end.
Ok, put down the power tools! Now it is time to paint! I recommend priming your camper with white paint first before doing any design; this will help your colors to look more vibrant. Try not to paint the bottom 1/8th of an inch of the camper. That way, the glue can stick to bare wood when attaching the camper to the base. Below is my camper, primed and ready to be painted.
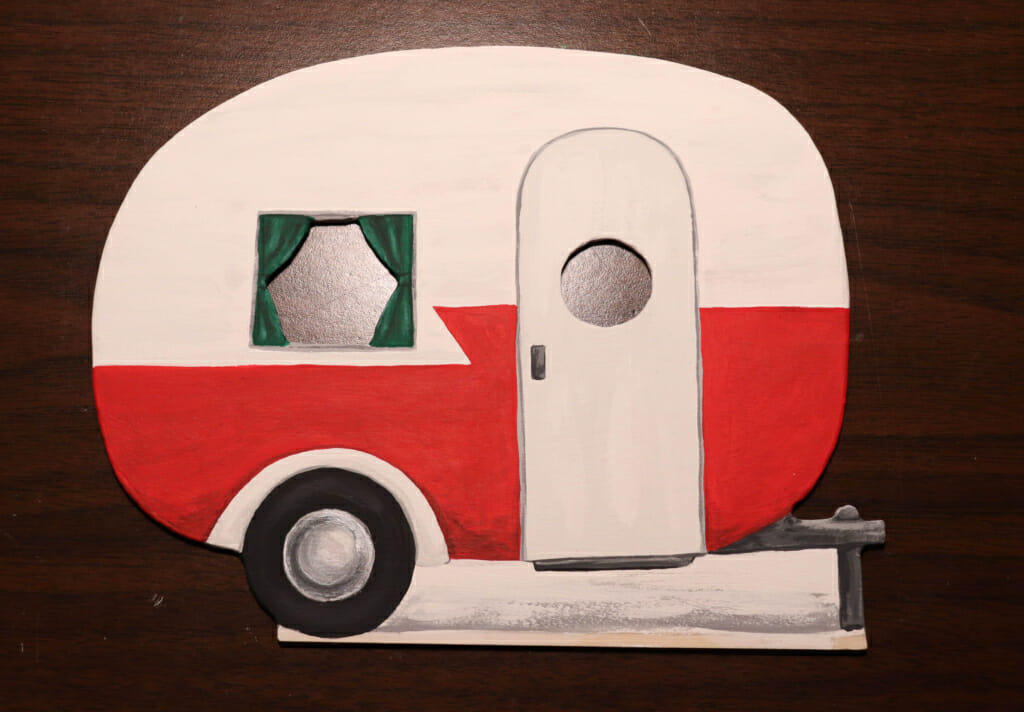
Chose a design for your camper and paint it accordingly. You can go as simple or extravagant as you like. Here is my finished camper.
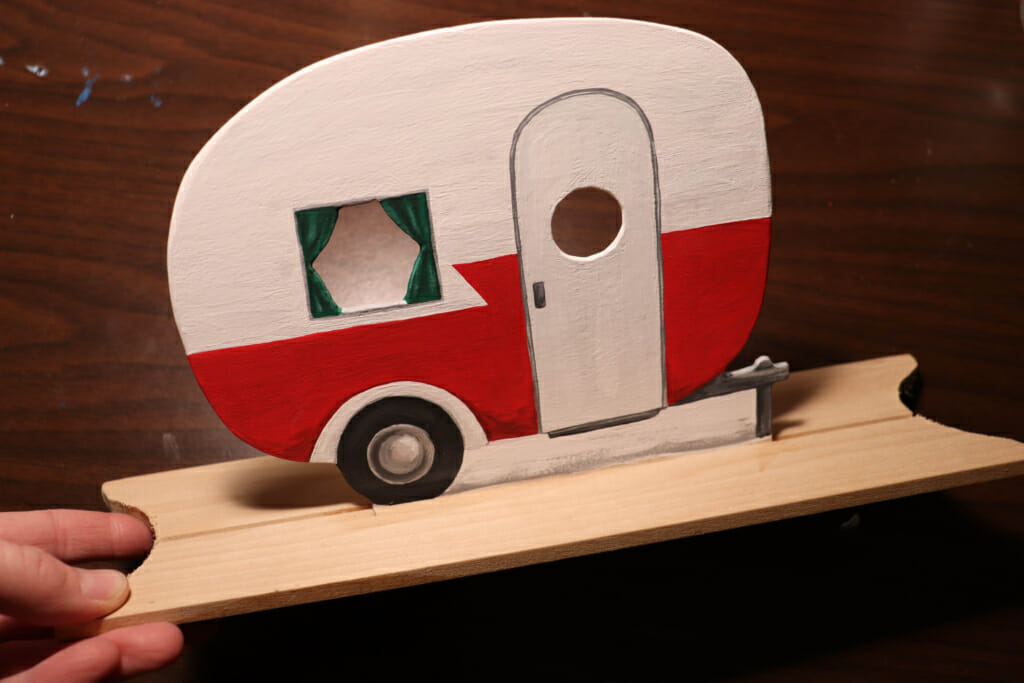
After your camper is painted and thoroughly dried, it is time to attach it to the base. If you are using a wooden base like I did, squeeze a line of wood glue into the groove of the base and place your camper in the groove. Wipe away any glue that squeezed out with a paper towel. Depending on how tight your camper is in the groove, you may have to use rubber bands or ties of some sort to keep your camper in place while it dries, my camper fit rather snug so this wasn’t a problem for me.
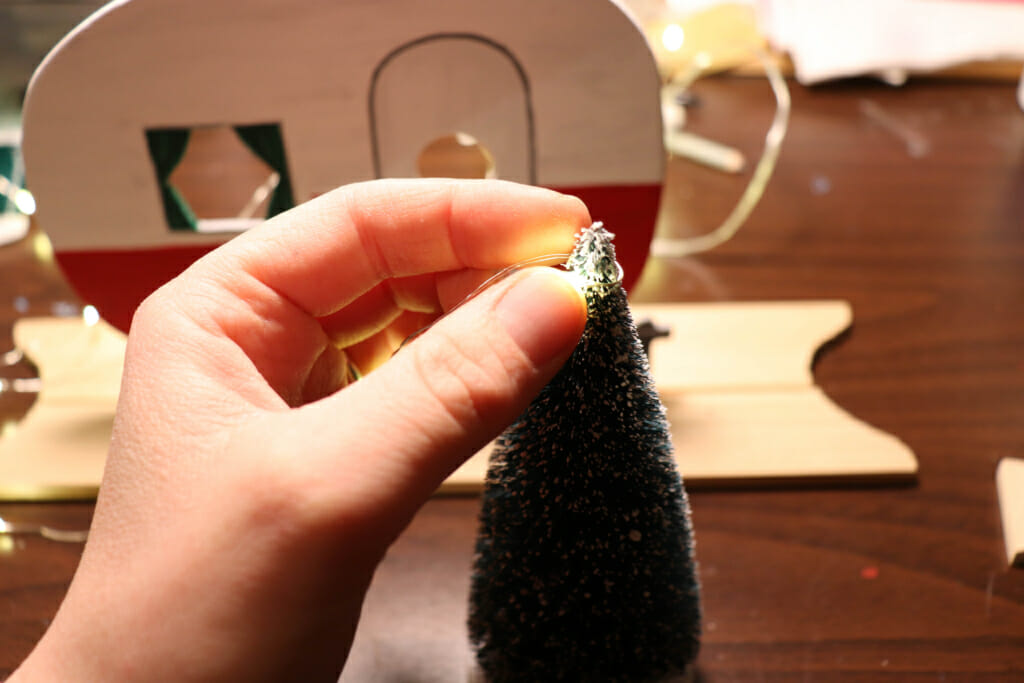
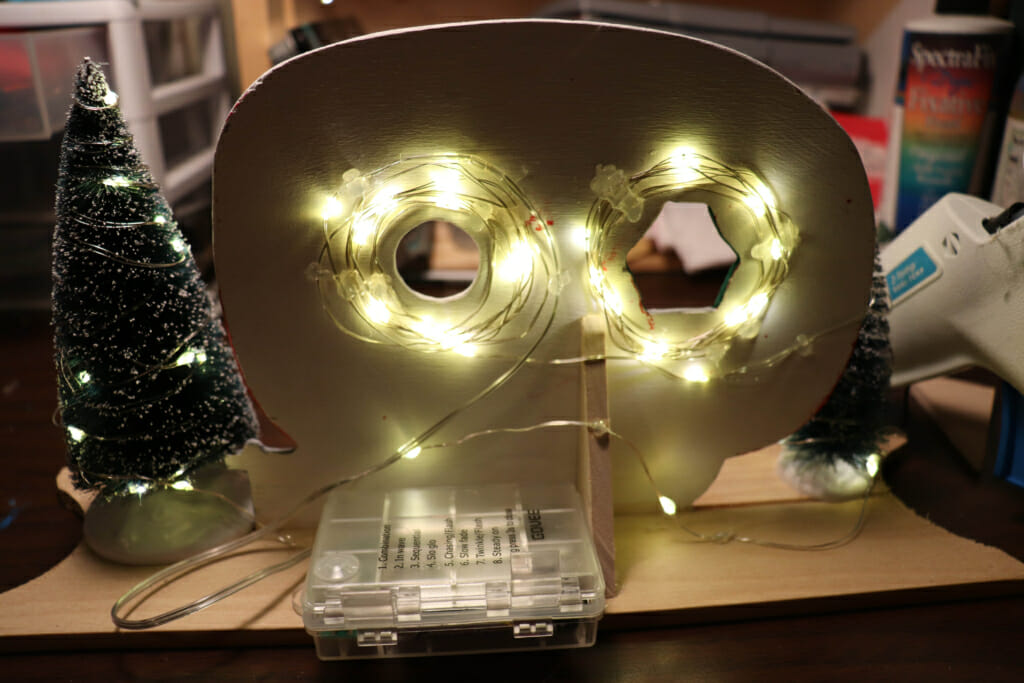
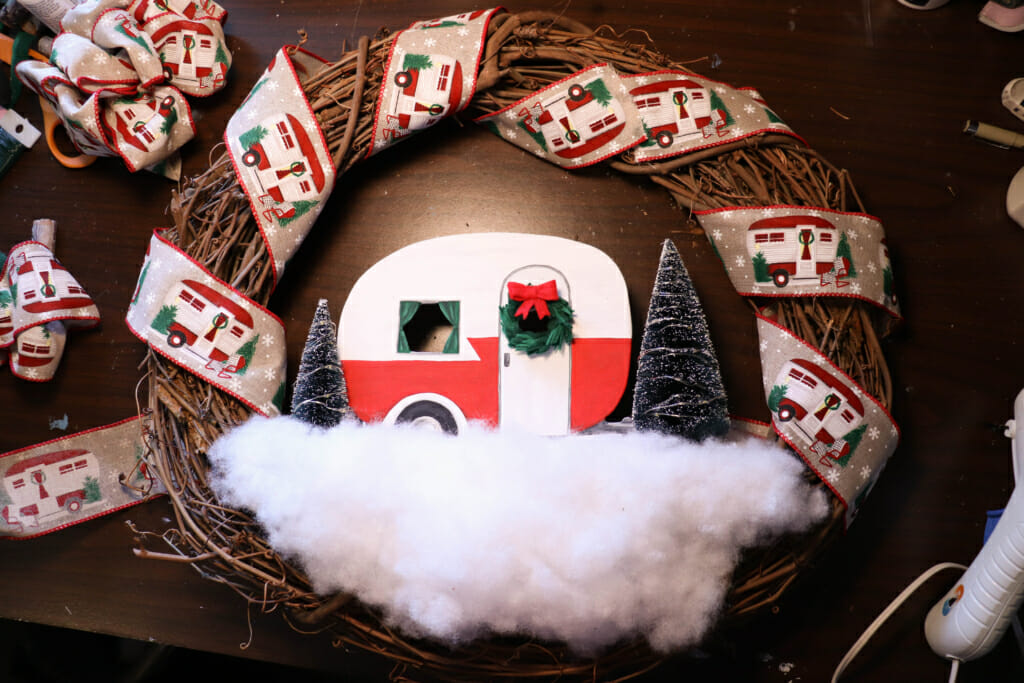
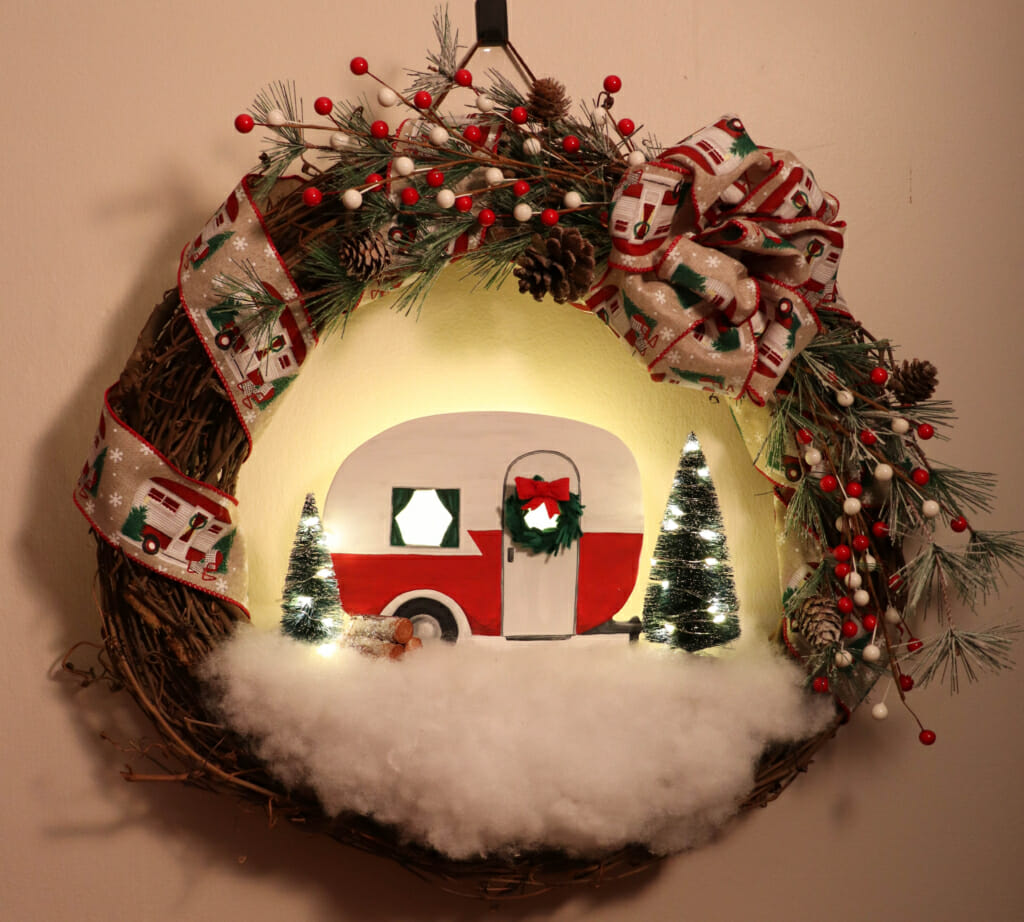
After the glue is dry, attach the triangle support to the back of the camper (if you need the support) using hot glue. Let it cool and harden. Next, test your string lights to make sure they are in working order. Attach the string lights to one of the trees by winding the lights around the tree, starting at the top. Be careful to make sure the LEDs are evenly dispersed around the tree.
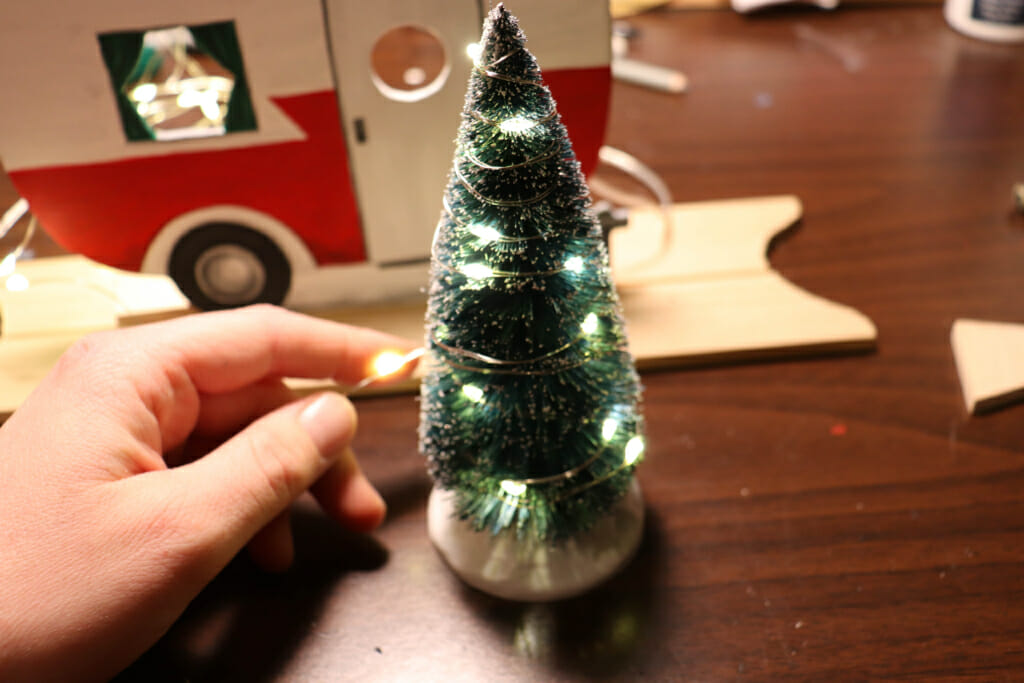
Add a dab of hot glue to the bottom of the tree and attach it to the base.
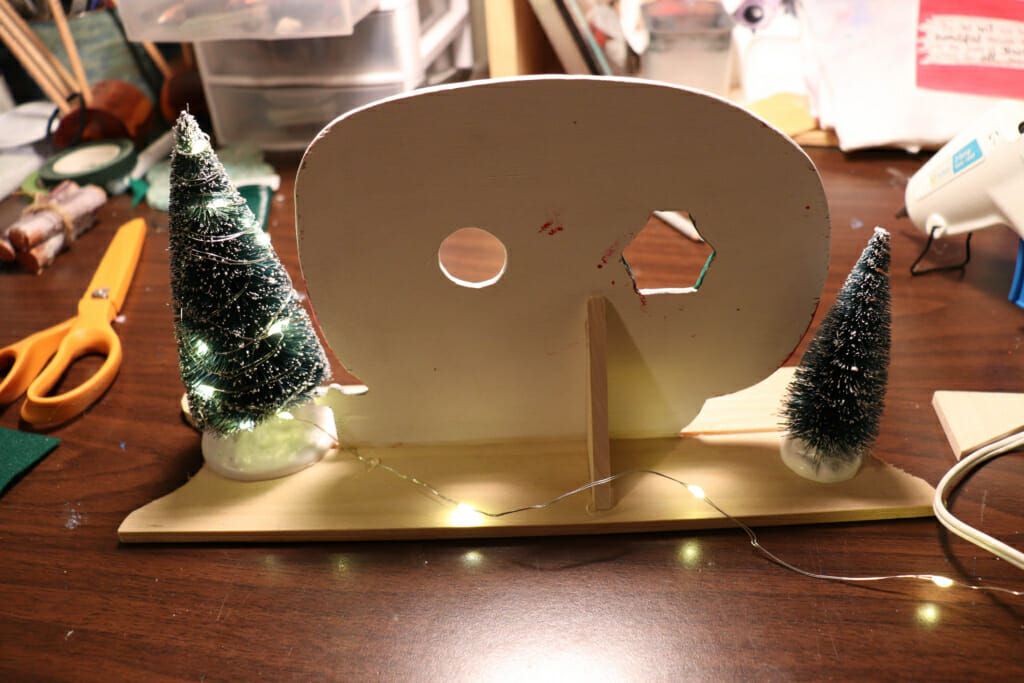
Add a dab of hot glue where needed to keep the sting lights in place. Try to keep the excess string lights hidden behind the camper as much as possible. Now, wind the string lights around the other tree.
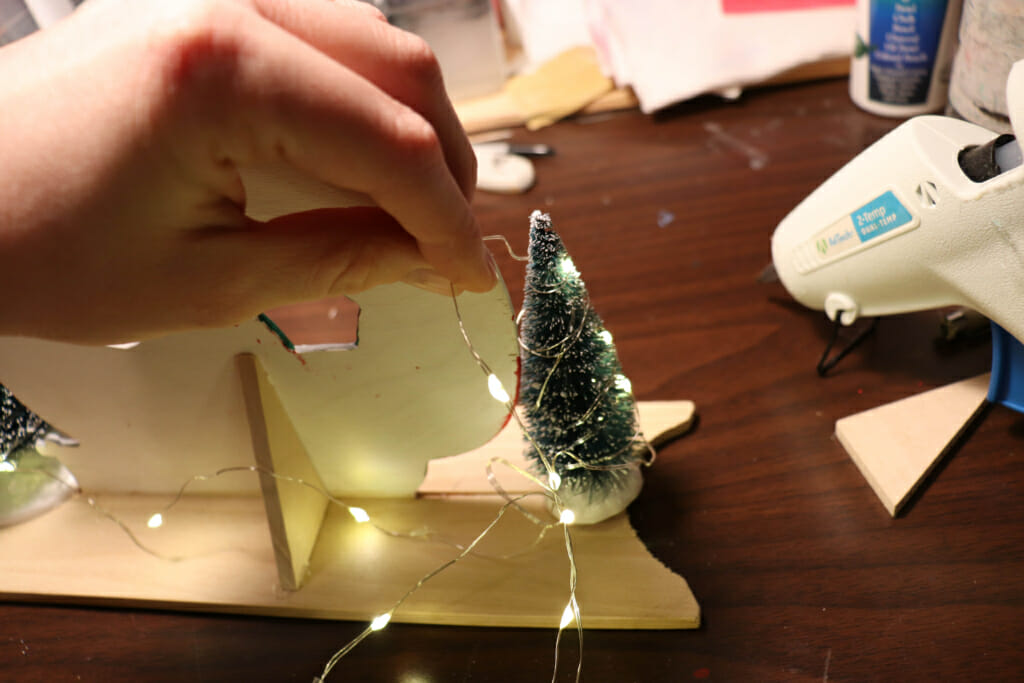
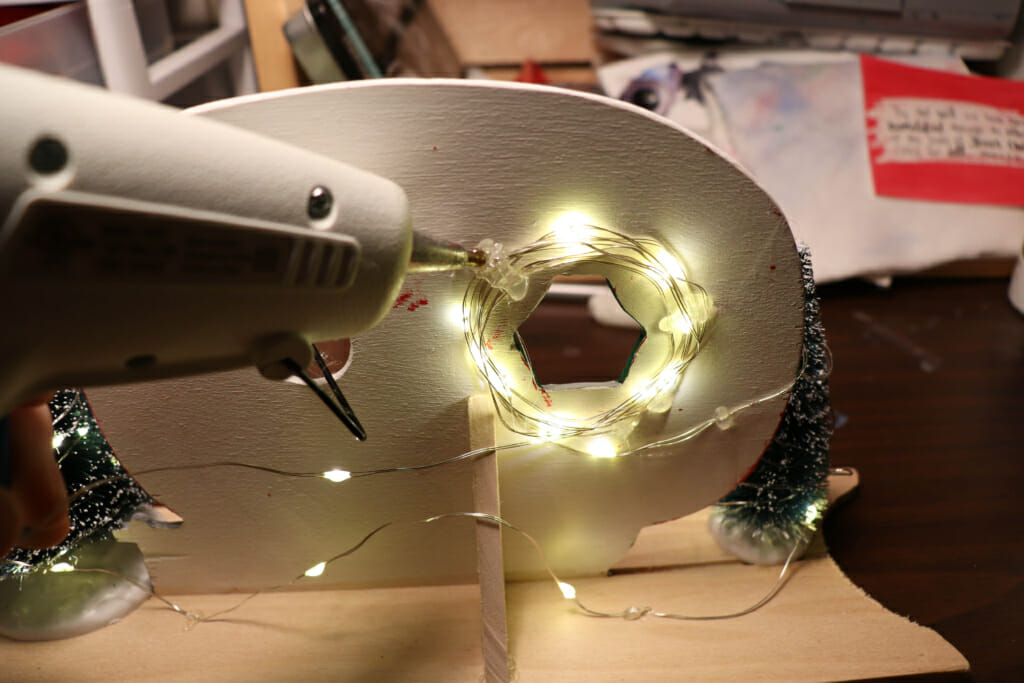
Then, attach this tree to the base. Now, wind your string lights around the windows on the back of the camper. Try not to let the string lights show through the window. This creates a backlit effect when the camper is placed up against a surface. Add a dab of hot glue here and there to keep the string lights in place. Do the same to the other window.
If you are using a wooden base or a base with a color other than white, I would recommend painting the base white. I did this because I found that after adding some of the fake snow, (in my case Polyfil) I could still see a little bit of the wood-colored base. It is better to glue directly to the wood instead of on paint because the paint can peel off with the glue.
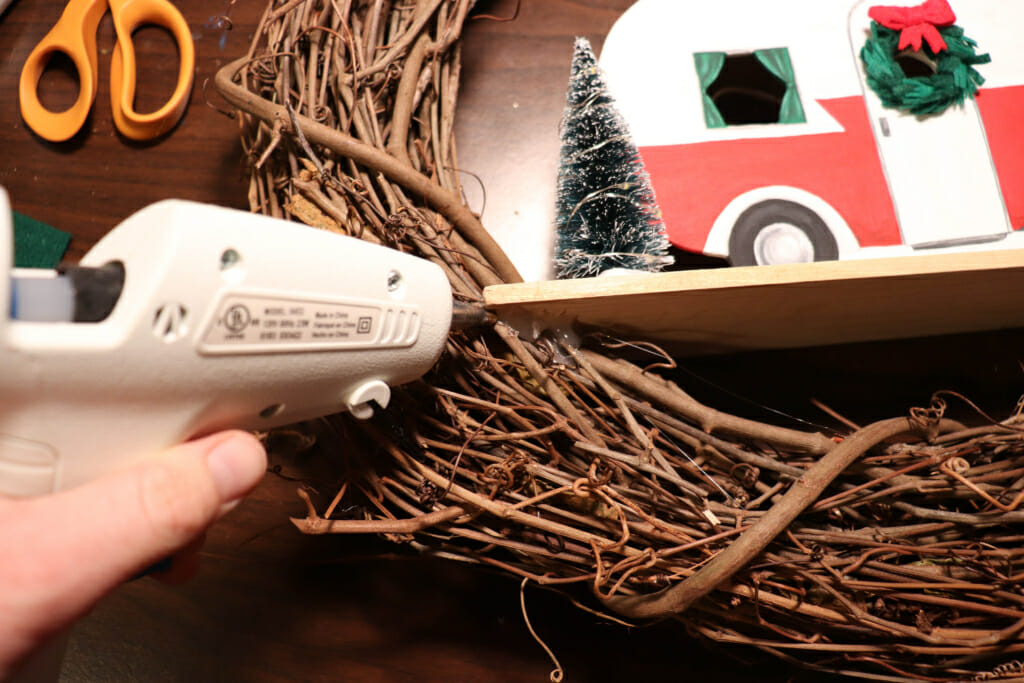
Next, attach the base to the wreath with lots of hot glue. Don’t worry too much if the glue is showing around the edges of the base, it will all be covered with the ‘snow’.
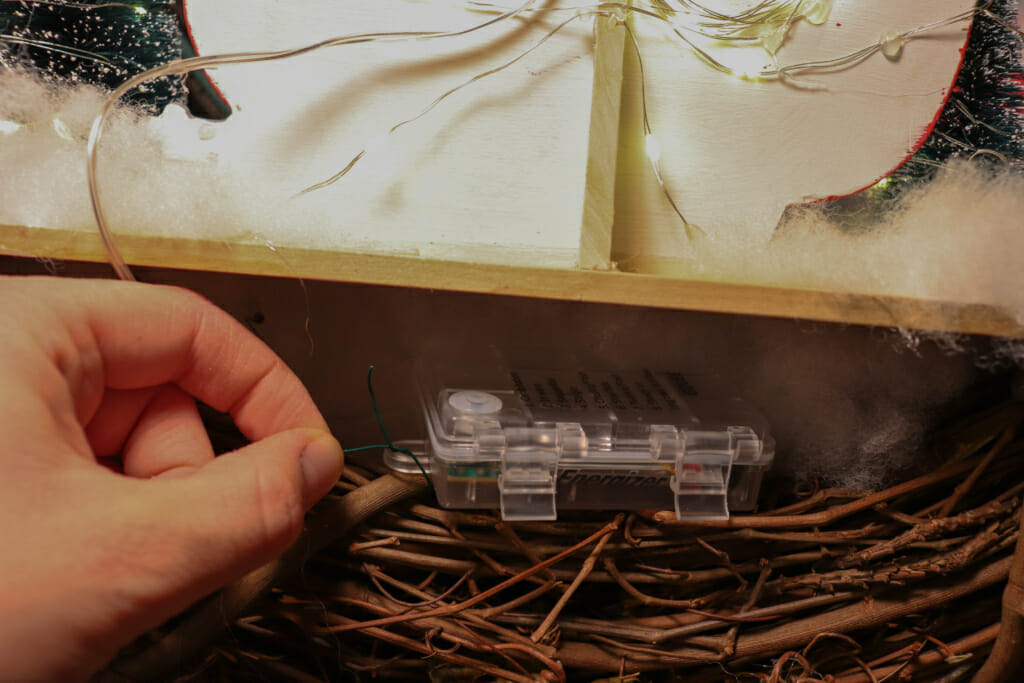
Next, it’s time to find a place to hide the battery pack for the string lights. I tried several solutions to this, but ended up using wire to attach it to the wreath itself under the base. Depending on the shape of your wreath, you may find a different spot to hide it. Just make sure you can access the battery pack easily to change the batteries.
Let it snow! Use more hot glue to attach your fake snow to the base. I used Polyfil because that is what I had on hand, but you could also get fake snow from a craft store as well. I had a decent amount of space under my base and the gap made it look like the camper was floating, so I opted to add more Polyfil to the bottom of the base and to the wreath using more hot glue to make it look a bit more like a snowbank or hill.
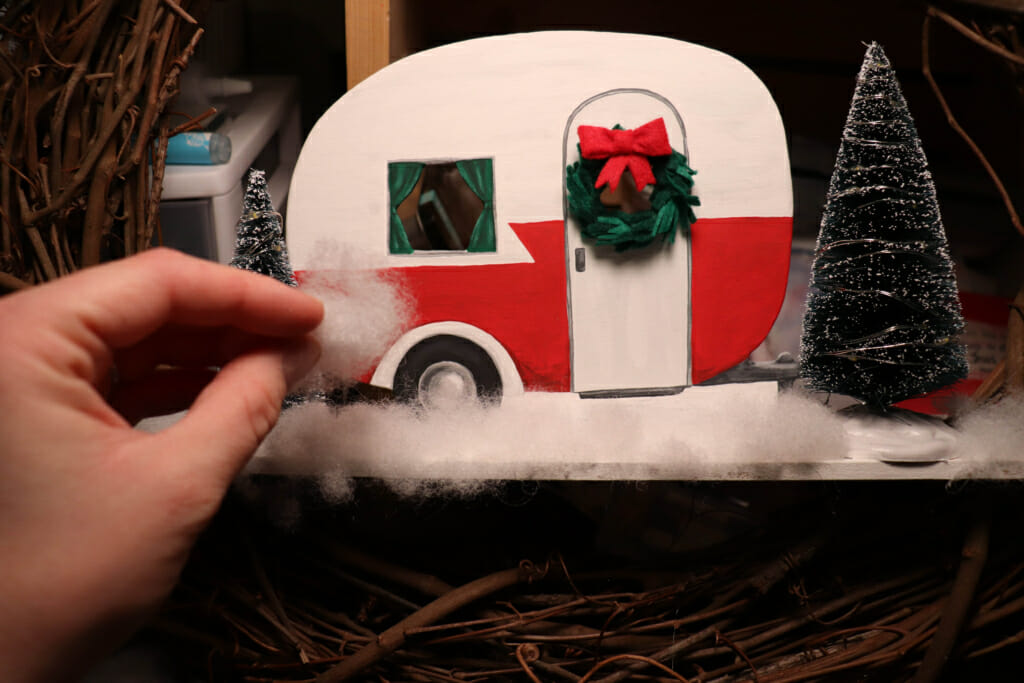
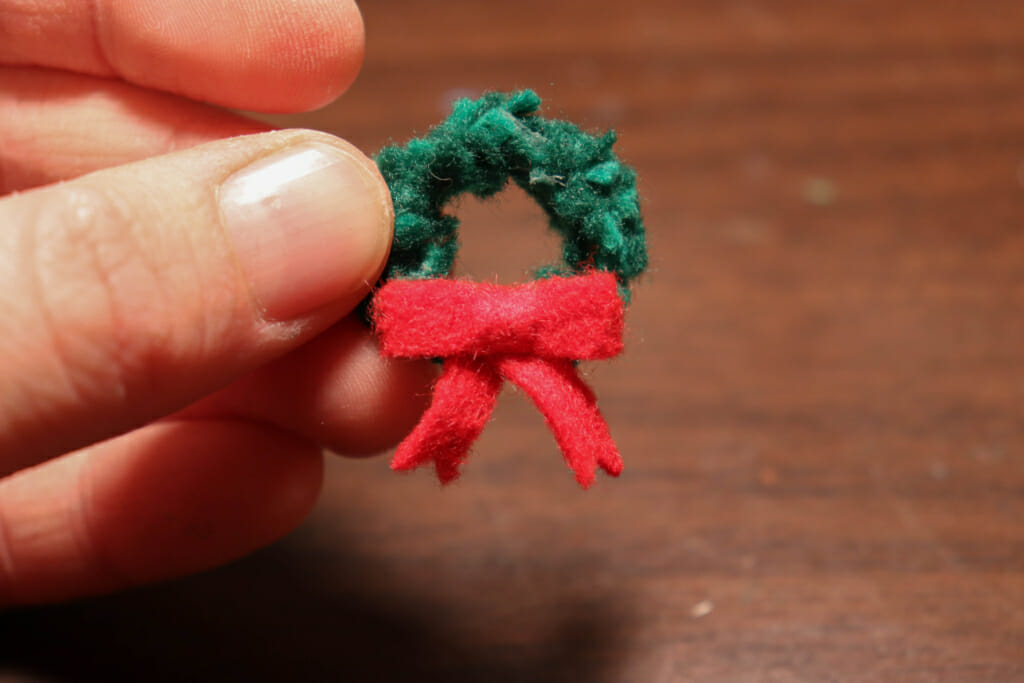
I made a mini wreath using felt and wire to add to my camper door. I also saw some cute mini decorative wreaths at my local craft store, so you may be able to buy one if you would rather not take the time to make one. But, if you want to make one here’s how:
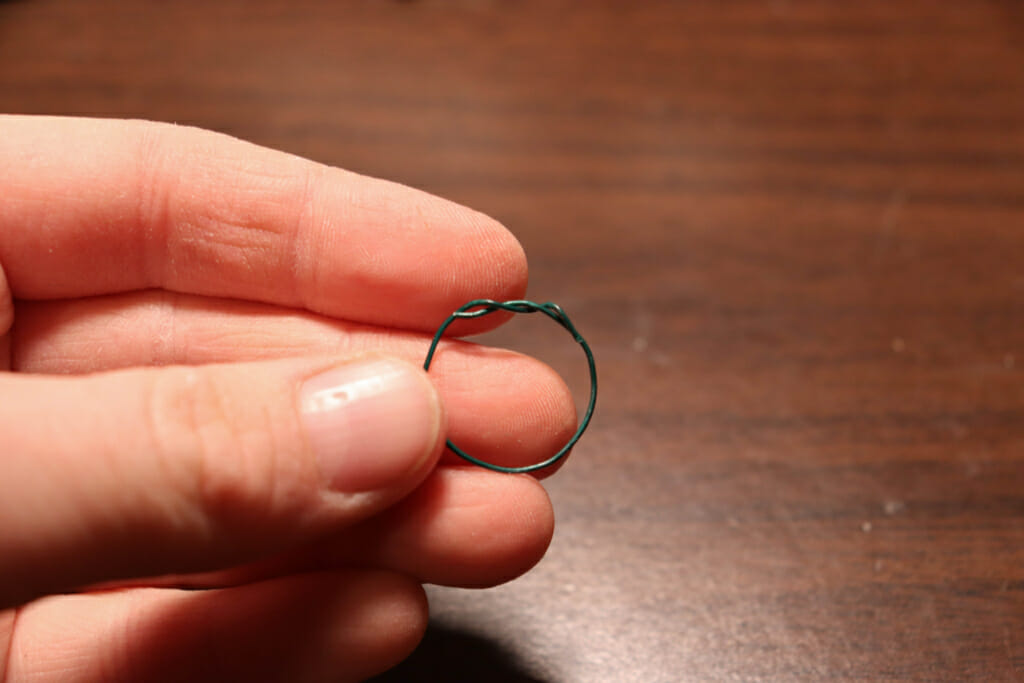
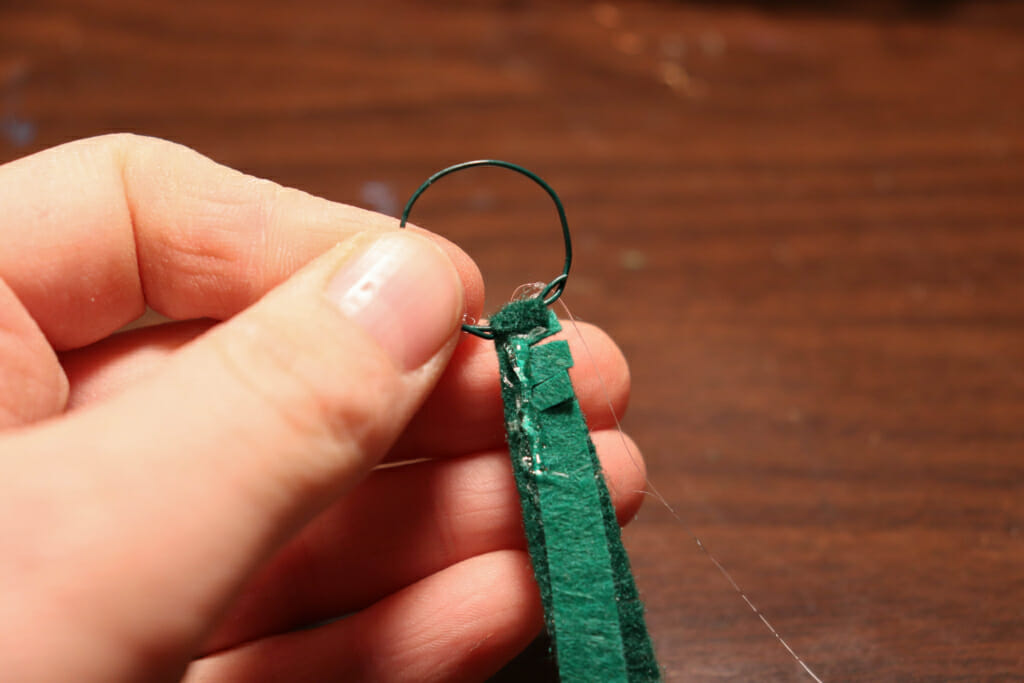
Make a loop of wire a little bigger than the size of your camper window.
Cut two thin strips of felt about 1/4 inch thick and 12 inches long. I opted to cut two strips of slightly different shades of green to add some dimension to the wreath. You could just cut one strip if you don’t want to take that extra step.
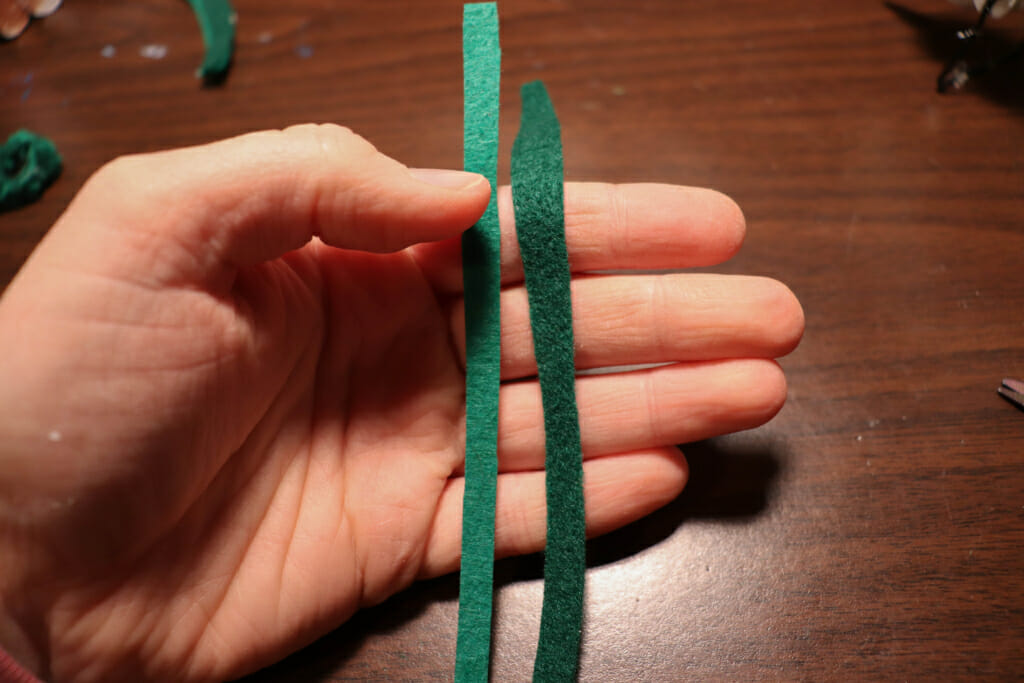
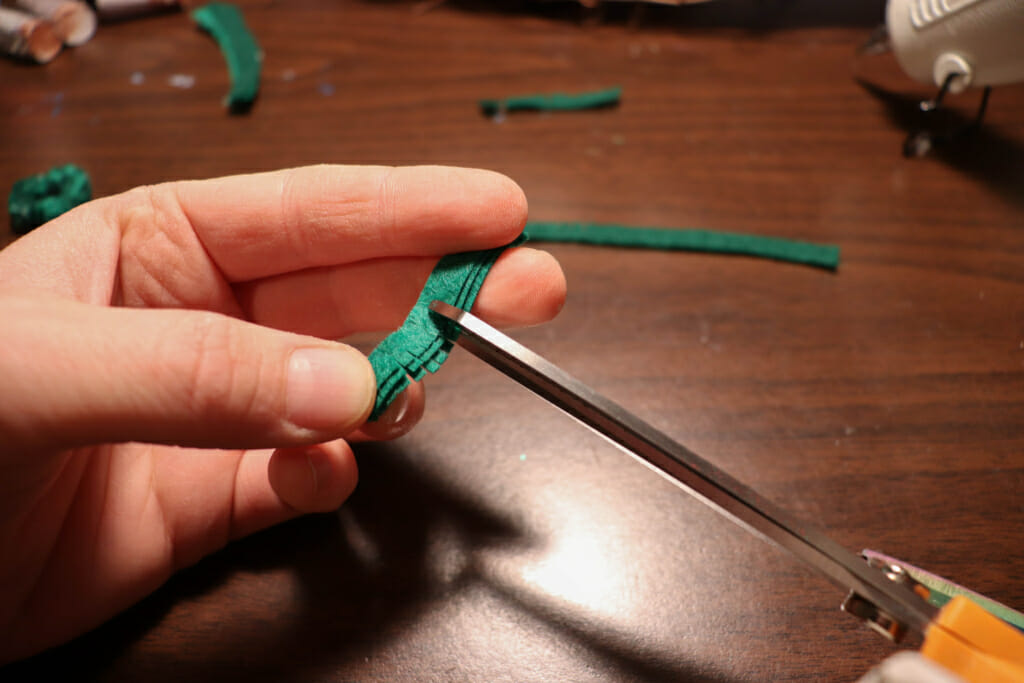
Then, take your strips and snip short cuts into the long side, being careful not to cut the whole way through. I actually folded my strips several times to make this faster (sharp scissors are helpful here. I used fabric scissors). You’re essentially making a fringe along one side of your felt.
If using two strips of felt, lay one on top of the other with the fringe pointing the same way and add a little hot glue; just enough to keep them together. Don’t do too much glue or it will make it too stiff for the next part. Next, add a dab of hot glue to one end of the strips and attach it to the loop of wire.
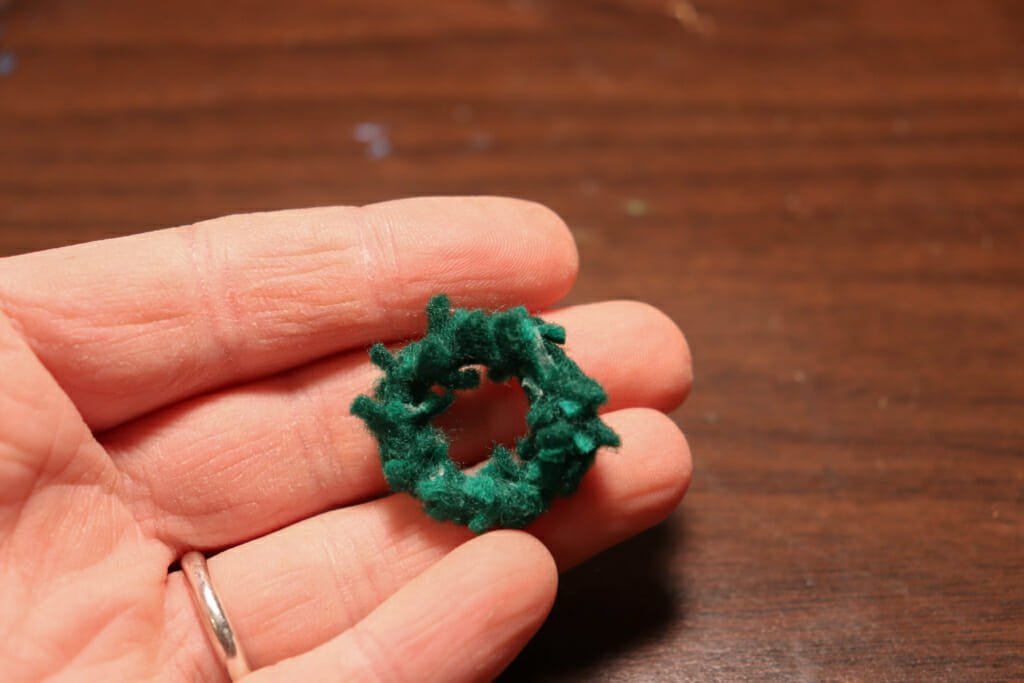
Add a little more hot glue to the strips and wind the felt around the wire loop.

Continue wrapping the felt and adding more glue all the way around, then cut off any excess felt.
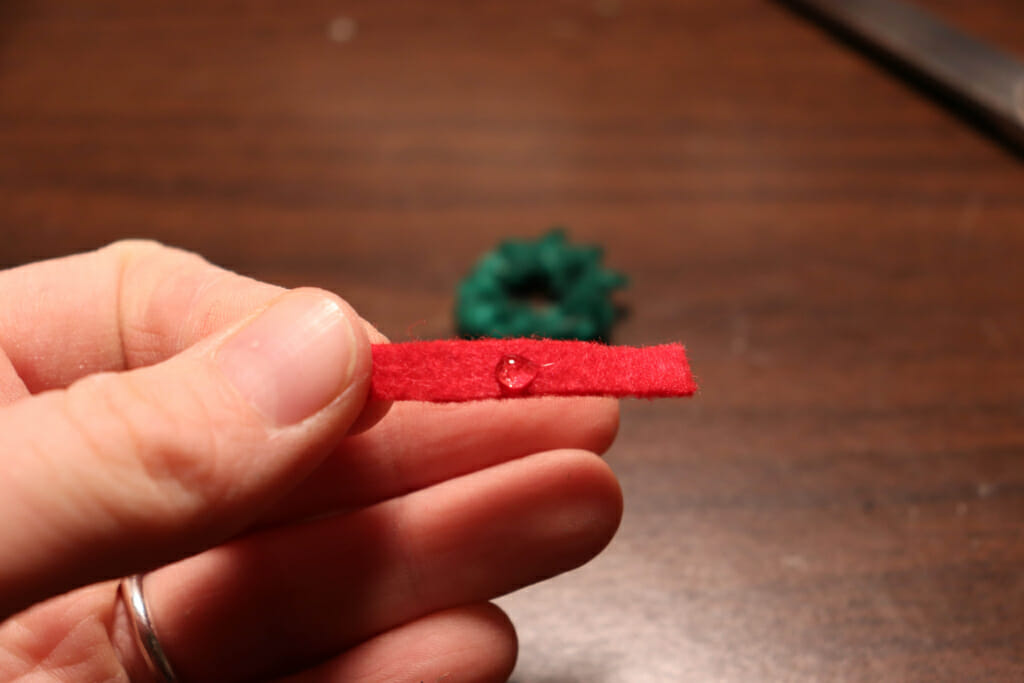
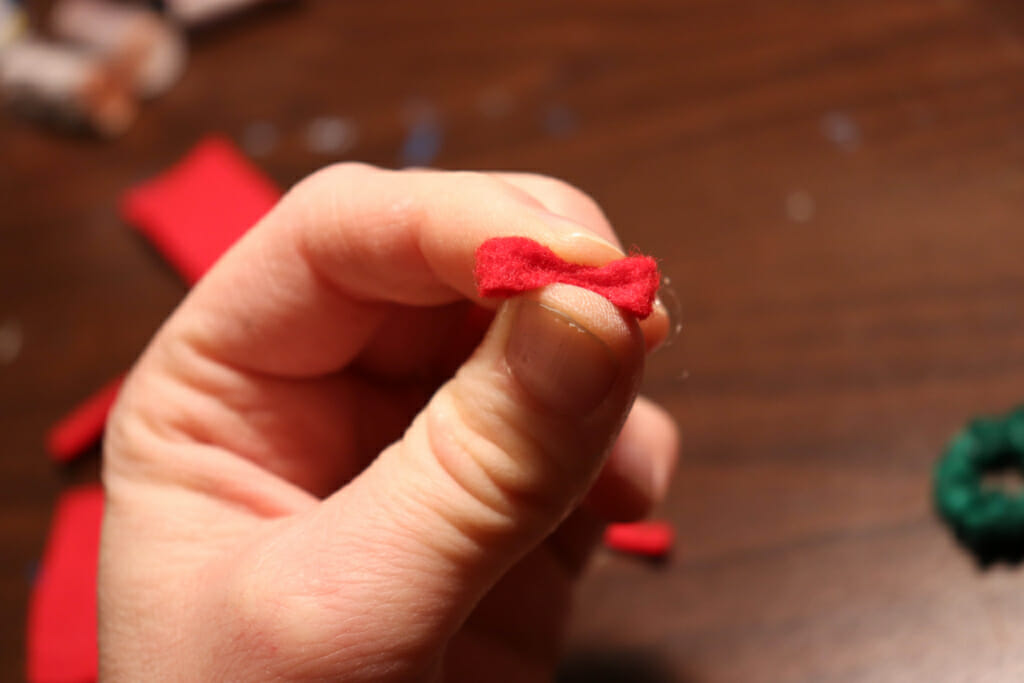
To make the bow, cut three strips of felt. Two about 1-inch long ¼ inch wide, and another strip ½ inch long and about 1/8 inch wide. Take a 1-inch strip and put a dab of hot glue in the middle and fold the ends to the middle.
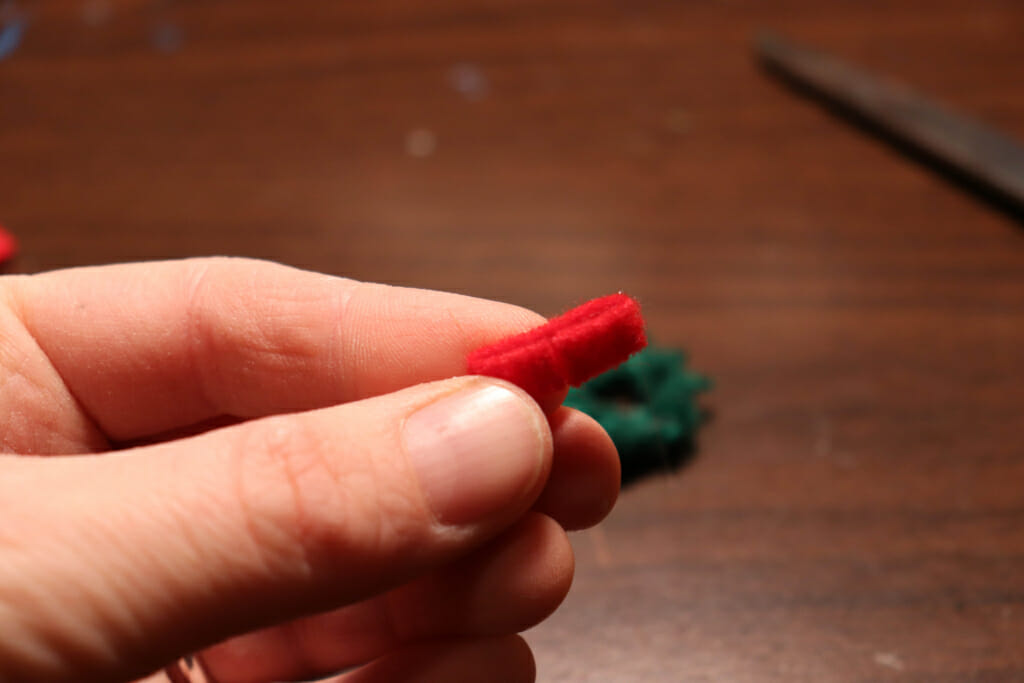
Next, pinch the middle between your fingers to try to create a small dimple in the front of the bow. Be careful because the hot glue is… well you know, hot. I kept my glue gun on low during this project so I would be less likely to burn myself.
Next, take the thinner strip and wrap it around the middle of the bow, adding a spot of hot glue to the back of the bow. Pinch the ends of the thin strip together until the glue cools. Then, snip off the excess.
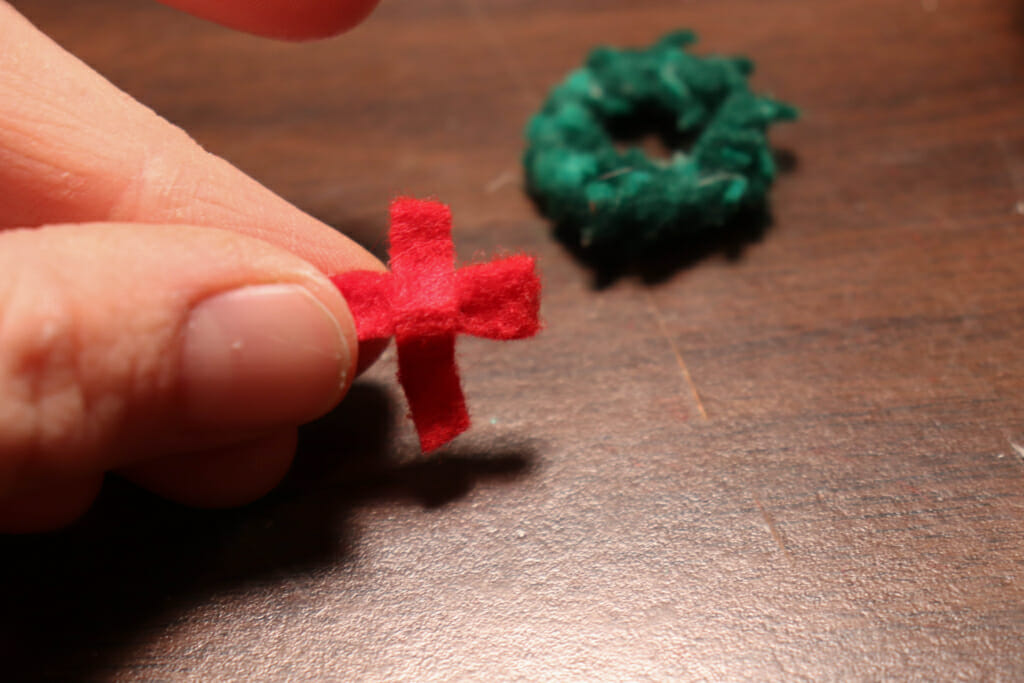
Next, fold the other 1-inch felt piece in half and arrange the ends at an angle that you like to be the “tails” of the bow. Add hot glue to the folded area to keep it in place. Add a small dab of hot glue to the back of the bow and attach the “tails” to the rest of the bow. For an extra detail you can snip the end of the tails diagonally or with a v shape. Then, you can attach your bow to your camper with hot glue.
I decided to wrap ribbon around the wreath blank for an extra touch. I also made a puffy bow out of more of the ribbon to create a focal point.
Arrange your fake greenery/winter branches on your wreath and decide how you want them to look. Once you decide how you would like your decorations, weave them into the wreath slightly and attach securely with hot glue.
Your just about done! Now, you just need a way to hang your wreath. I used florist wire and wrapped one end around a few of the grapevines in the back of the wreath. Then, I made an arch and looped the other end of the wire around more grapevines on the back of the wreath, twisting both ends around to keep the wire secure. Be mindful when doing this part that where you put your wire will affect how straight your wreath hangs.
Ta-da! All that is left is to turn on the lights and enjoy the glow!
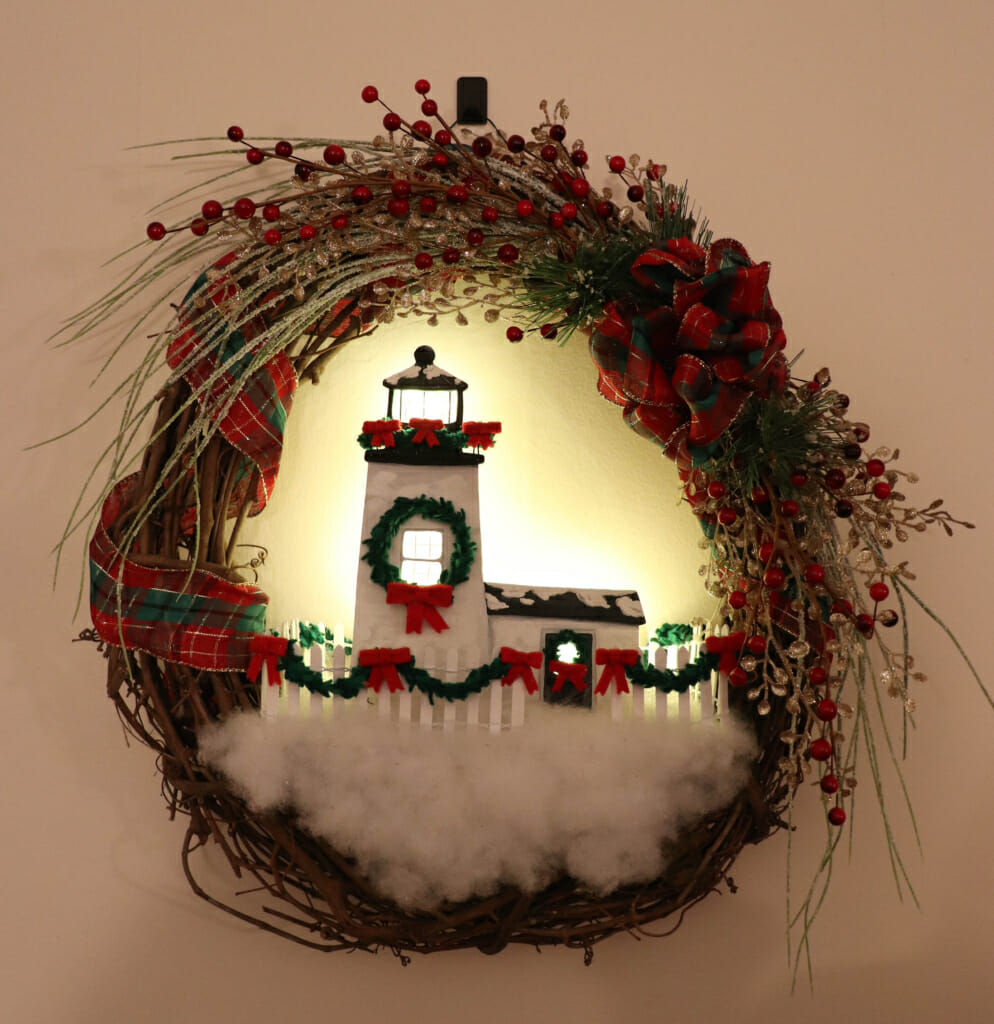
Also, I want to share a variation of this wreath that I made for my mom for Christmas.
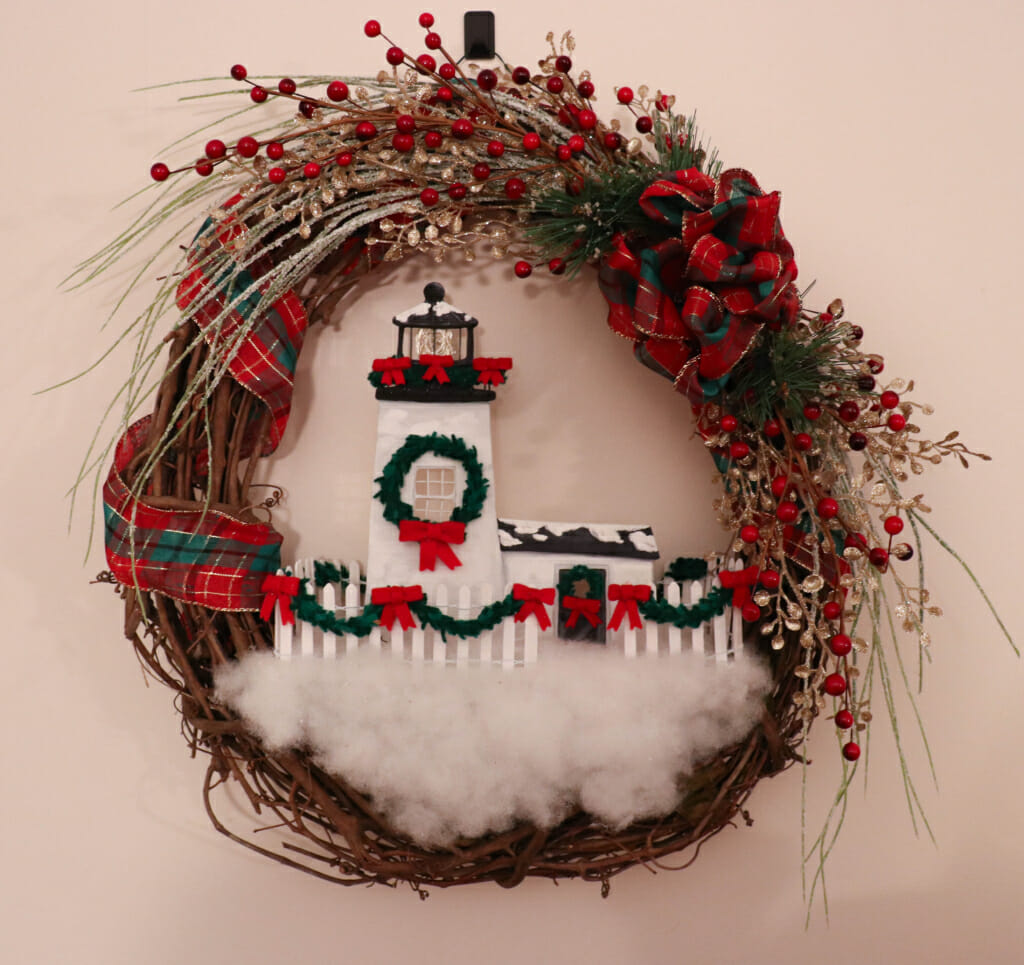
She loves lighthouses, so I made a wreath with a lighthouse cut-out inspired by the Pemaquid Light in Maine. I used the same process for both wreaths. I’m excited to try more variations of these wreaths. I think it would be cute to do a mountain scene with light shining out from the back. Or a Christmas barn. Or do a fall wreath with a pumpkin truck. I would also like to play around with a summer or spring theme, maybe try to make the string lights look like fireflies in a forest? The possibilities are endless! Hope you are inspired to make one for yourself or a loved one!
DISCLAIMER: Some of the links included might be affiliate links. If you purchase a product or service with the links provided, we may receive a small commission. There is no additional charge to you! Thank you for supporting The Daydreamers Journal!
- Written By Danielle D.